Archives for category: Vintage

My latest before and after project was salvaging this old, dilapidated Victrola.  It was really in rough shape – deep cracks, missing a door, broken hinges. But, the label on the bottom said it was made in 1924, so I could not resist trying to salvage it!

victrola before

IMG_4972

Step one was cleaning the entire piece (it had many, many years of “I’ve been sitting in a garage” grime).

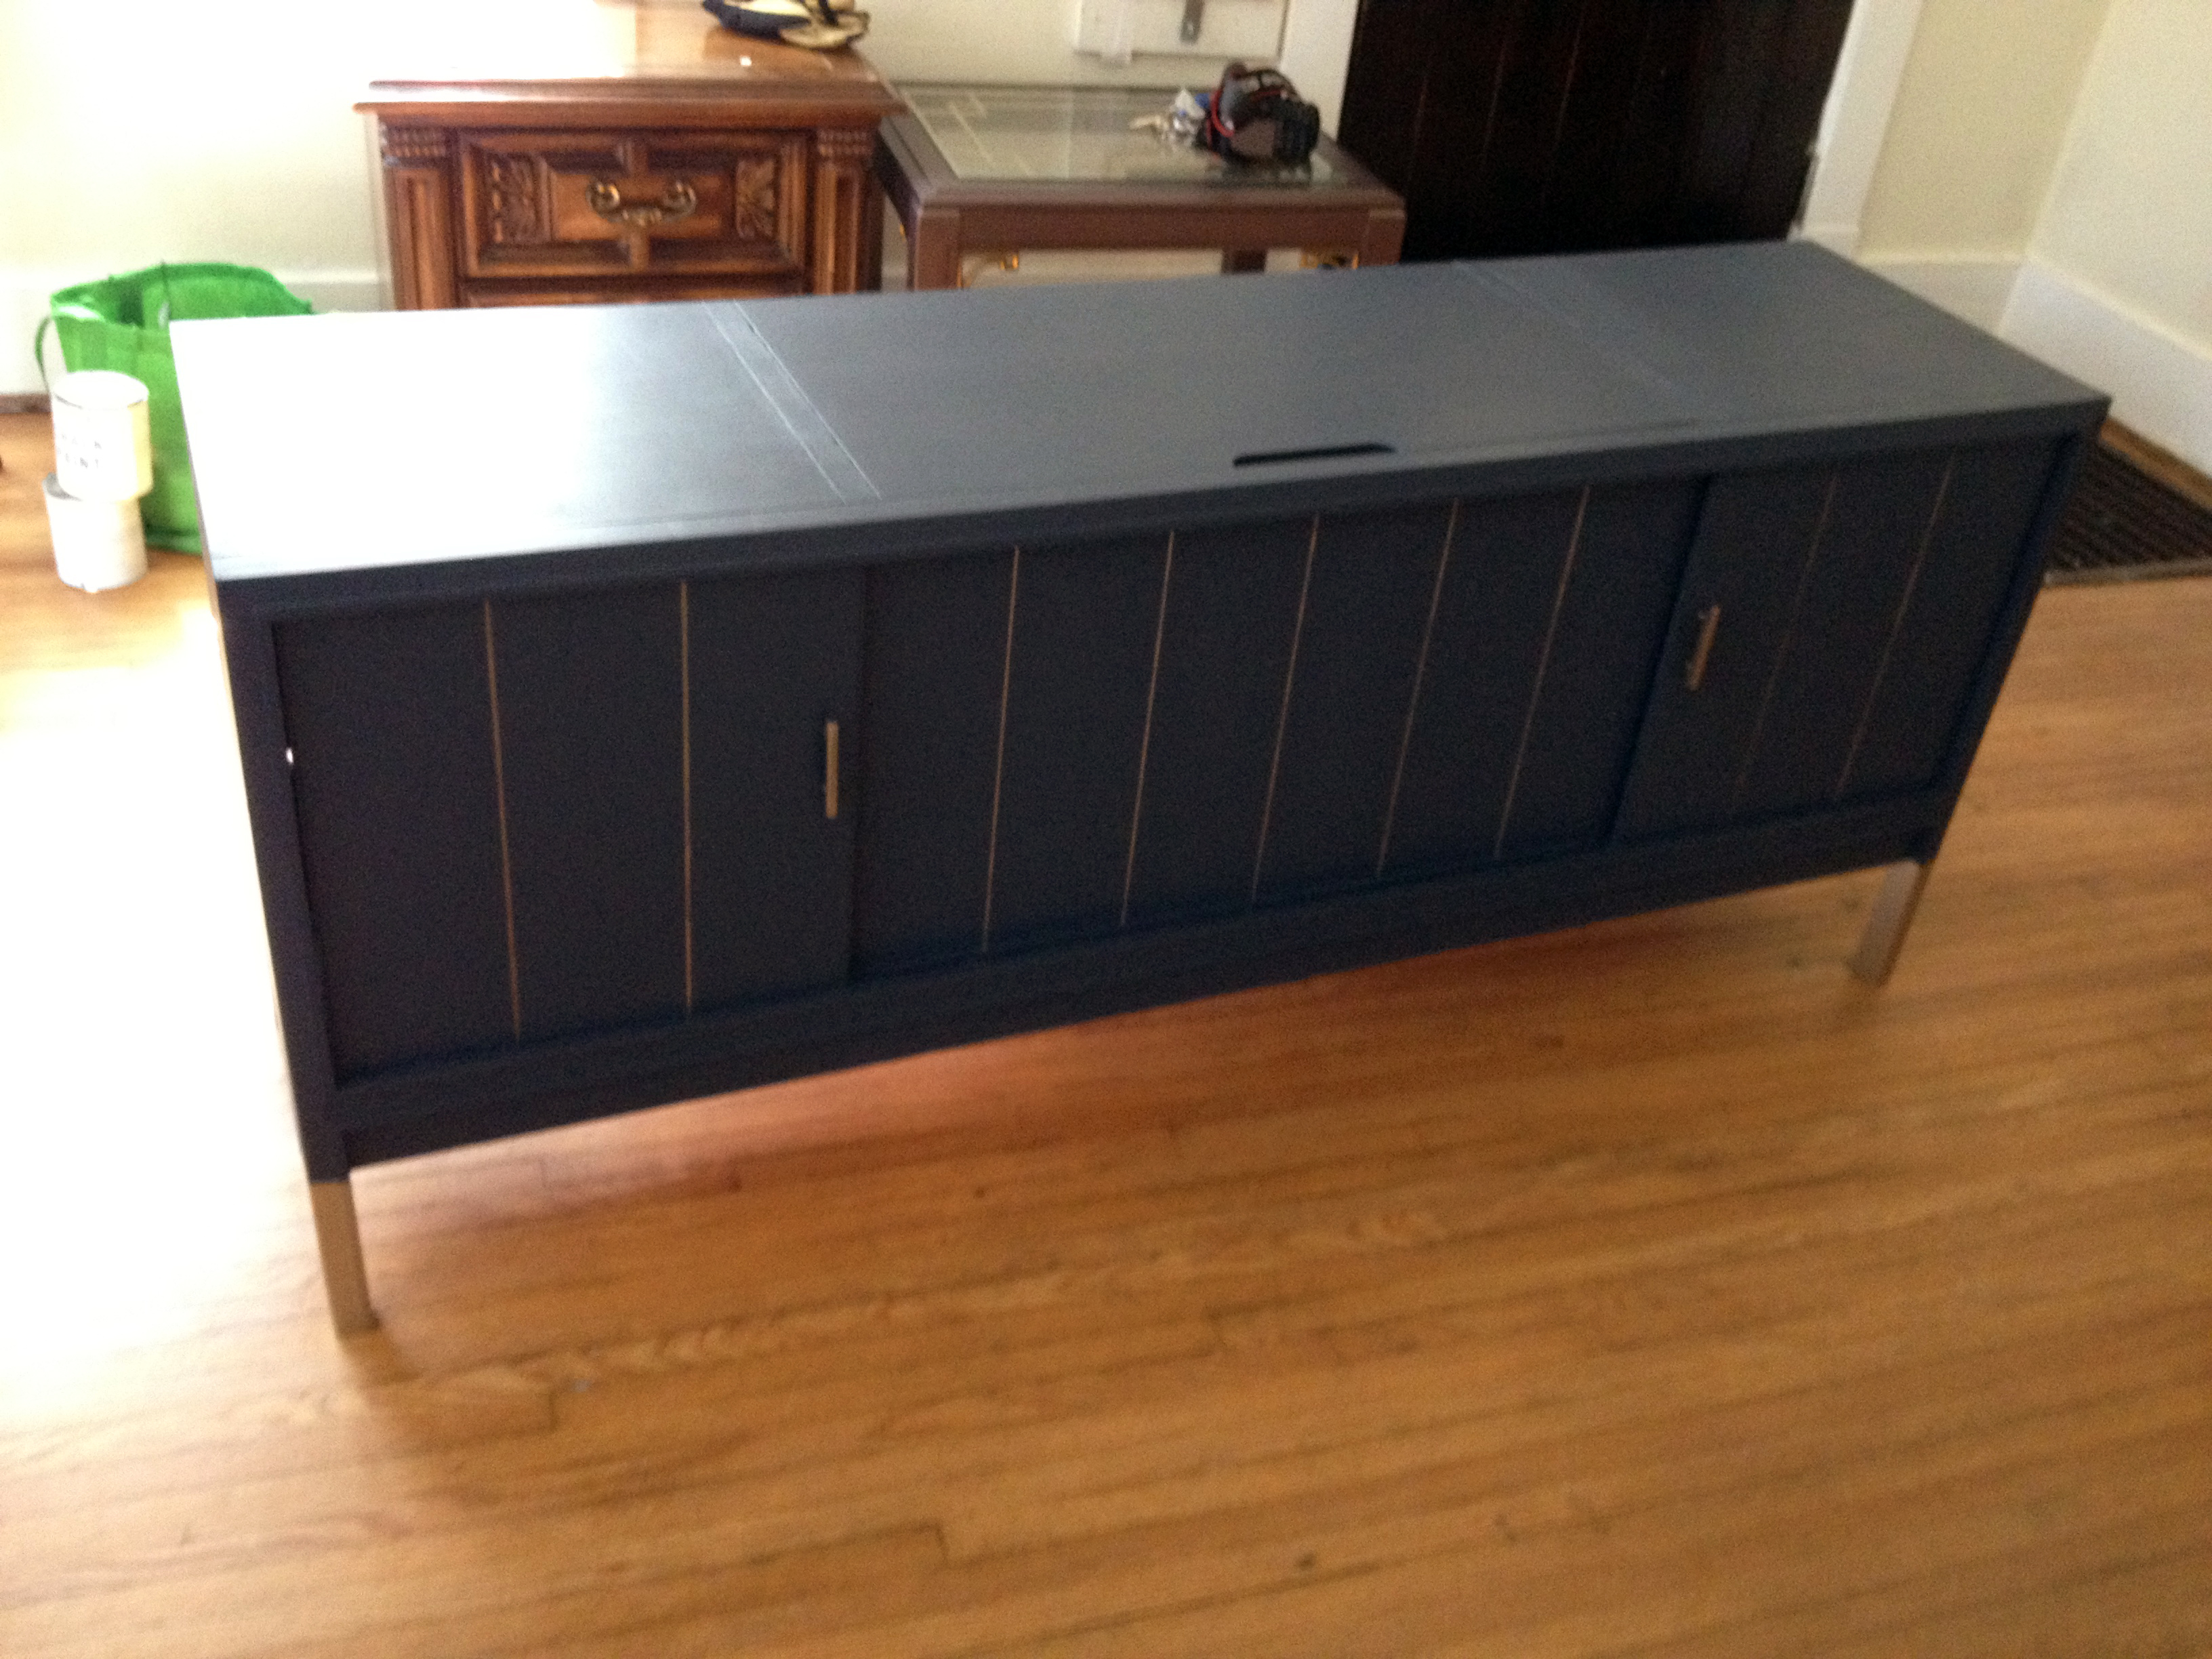
My good carpenter friend helped make a new right door and found a vintage hinge online that would fit.  Once the new door was in place, I realized that I wouldn’t be able to just sand a restain it – the cracks on the body of the piece were too deep, and I wouldn’t be able to easily color match a new door.  So, I opted for paint and moved forward with priming the piece. I chose a gorgeous gray paint and accented with bronze metallic paint (from Martha Stewart’s line at Home Depot). Added new hardware, reconnected the crank, and voila! A gorgeous record cabinet!  Plus, as a bonus, the turntable actually still works. I imagine some industrious person could find a new needle and actually make it play.  Currently, I am selling this piece for $375. More information at www.facebook.com/encorefurnishingsnashville.

photo 1_editIMG_5779_edit IMG_5781_edit IMG_5783_edit IMG_5785_edit IMG_5787_edit  photo 2_edit

We ended up having to totally restructure the fireplace, which was sad but has led to two good developments in the project:

1) We are going to repurpose the old mantel and use it as a decorative piece on the front porch – so excited.

2) We are going to use an unfinished-edge piece of vintage lumber as the new mantel!!

We started thinking about the possibility of using a vintage piece last week, and my brilliant mother knew exactly where to go: Woodstock Vintage Lumber. After wandering through the yard without any pieces really speaking to us, the owner Brent got a funny look on his face and disappeared. He then came back with the most unbelievably gorgeous piece of Tennessee Red Cedar. It was the perfect size, shape and color for the mantel! Here is what it looked like before sanding and planing:

Image

It was love at first sight, so we purchased the piece. Billy, one of the Vintage Lumber geniuses, took the piece and planed one side so it would fit against the wall and sanded the whole thing. Here he is showing off his handywork:
Image

And a closer look at the finished mantel:
Image

Image

And my cute mom (who hid from the camera), holding the piece over the unfinished fireplace:

Image

So thrilled about this find!!

I recently acquired an antique brass lamp, and it is in great condition and a beautiful shape. But, I wasn’t really feeling the brass finish. A little too brassy, pun intented (feel free to roll your eyes). But, in only an hour, I was able to give the lamp a great, oil-rubbed bronze look that I LOVE.  Here’s how:

Image

Step 1: Gather your supplies. For this project I used Minwax Color Express in Walnut. This is a great, easy-to-use stain that adheres to all kinds of surfaces. I used a small plate as a palette and applied the stain using a small paintbrush.  I then used a stencil brush to get the faux-antiqued look.

Image

Step 2: Messily apply one coat of the stain with a brush. It doesn’t have to be perfect because we are going to use the stencil brush to get the finish we want.  I did this step and the next step one section at a time so that the stain wouldn’t dry before I had a chance to use the stencil brush.

Image

Step 3:  Using the stiff stencil brush, pat the stain to remove brush strokes and get that antiqued look. This step felt to me like I was a pointillist artist going to town on a canvas. The nice thing about this step is that you can’t really mess it up – if you accidentally rub off some stain or get a thumb print, just dot over that section again with the stencil brush.

Image

Step 4: Let it dry and you’re done! Super easy project. This lamp took less than an hour to complete. You can use the same process for antiquing cabinet hardware or even an old mirror.

I’m selling this lamp on Etsy – Go check it out!

Insta-love

#Retro

Found these LOP (lots-o-potential) chairs at a yard sale recently, and I was so glad to have the long weekend to fix them up!

Image

The first step was to clean the spider webs that had infiltrated the chairs, then I did a quick vacuum and OxyClean of the upholstery.  It was actually in great shape, it just had a couple of small stains that came out quite easily.

I then sanded down the varnish and prepped the chairs for painting by taping off the upholstery sections. I don’t always use painter’s tape, but when it comes to upholstery, I take no chances. An ill-timed sneeze could ruin everything.

I then painted the chairs using Annie Sloan’s Old White – two coats. I only did one coat on the cane side panels because I sort of loved the shabby chic look that gave. After the paint had dried, I sanded corners and edges for an even more cottage-shabby look, sealed the paint with clear wax and that was it!! So thrilled with how they turned out:

Image

ImageImage

To purchase these or see more of my pieces – visit www.facebook.com/encorefurnishingsnashville!

photo(2)

Before…plain side table – gorgeous shape.

Found this great little side table on Craigslist in truly perfect condition…solid wood, sturdy. I love the shape of the piece, but I was not a huge fan of the faux leather top and honey oak color.

photo(3)

Before


But, I had some Annie Sloan chalk paint left over from an older project – a can of French Linen and a can of Graphite…

photo(1)

Ta-da! Two tone table.

side table

I kept the two-tone top, used graphite for the center section. Please ignore the pug.

side table1

I also used the Graphite to fill in the grooves and highlight the details.

This piece, along with some of my other work is available via my Facebook page: http://www.facebook.com/encorefurnishings

After some strategic yard-sale-ing last weekend, I found myself in possession of three vintage farm chairs. They were each in fairly good shape, just in need of some glued joints and a coat of paint. I have always wanted a mismatched chair set painted all in one color, and this was my chance! I chose a very pale mint green for the chairs, and I think they turned out beautifully!  Here is a step-by-step how-to on painting these vintage chairs:

Photo-6_14_13-9.54.02-AM-2

First chair, before.

Photo-6_14_13-9.54.02-AM-12

Second chair, before.


Chairs Before.

Third chair, half-primed.

Step 1: Assess the structure of each chair and glue joints with wood glue when needed. Each chair needed a little bit of glue on the legs, and the second chair needed some wood-filler on the seat. You could also glue any gaps together and clamp the entire chair, but I decided to go the wood filler route since it would be faster, and I am impatient.

Fill in gaps with wood filler.

Fill in gaps with wood filler.

Step 2: Sand and prime. I always do a light sanding before and after primer. My favorite primer to use is Glidden Gripper because a) you can get it at the Home Depot around the corner from my house and 2) it seems to stick to everything. And when I say everything, I really do mean everything. Case in point: I primed these chairs a few DAYS ago, and just YESTERDAY when I went to get my hair cut, my stylist starts looking through my hair and asks “Have you been painting?” because there was STILL PRIMER STUCK IN MY HAIR. Days later! After multiple showers and hair-washes. I promise I am hygienic. Gripper just sticks. to. everything. forever.

Step 3: Paint!  I painted with a latex mint paint (also Glidden, also from Home Depot). I had the color mixed specially from a sample I brought in. Two coats should do the trick, if you have primed.

Photo-6_14_13-9.54.02-AM-4

First chair drying.


Two chairs drying.

Two chairs drying. And a pug butt.

Voila! Three mint chairs!

Voila! Three mint chairs!

Would love to know your thoughts! And, I’m now in the market for a fourth chair to paint to complete this set…send me any leads you can find!

Well, my pitiful excuse for an Etsy shop got a couple of new additions today!

Look at these beauties:

Vintage wine glasses

Set of 5 vintage wine glasses for $25!

And I almost hate to part with this gorgeous jewelry box:

jewelry box

$30 on Etsy!


To see more photos, visit my shop!

Apparently I have a thing for vintage record player cabinets. This is my second record cabinet makeover in recent days (see the first), and I am as much in love with this one as the last. I found this Mid Century style record console that had been gutted on Craigslist and picked it up immediately.

photo(36)

It is solid wood, and was in fairly good condition. Except it was FILTHY. Truly one of the more disgusting pieces I have found. Exhibit A:

cabinetbefore

So, I busted out the DL hand cleaner (aka the best furniture cleaner in existence) and spent a solid two hours scrubbing and sanding. I have found that when I am planning to paint a piece, I will typically use the DL and then spend as much time sanding, first with 120-grit to really get the finish off, then with 320 to smooth the edges.

I removed the hardware, pulled the doors out and primed the piece with Gripper primer in grey, then I began to paint.  I wanted to minimize brush strokes for a smooth finish, so I used a small, dense foam roller brush and satin finish paint in Martha Stewart’s “Wrought Iron” (which is the same color I used on the last record cabinet. I am clearly obsessed with this deep grey-blue).  Then, after I had painted three coats in the Wrought Iron, I taped the legs and painted just the feet in a metallic gold paint (Martha Stewart specialty finishes – Vintage Gold). I was inspired by several Mid Century pieces that have metal sheathings on the feet:

middesk

(Source)

Back to the console…I finished the feet and then used the gold with a tiny brush to highlight the vertical lines in the front of the piece. And, I’m pretty happy with it! I put this baby up for sale on Etsy, as there is sadly no room for it in my house. Check it out: https://www.etsy.com/listing/126303051/mid-century-record-console-media-cabinet

recordcabinet4 recordcabinet1 recordcabinet2 recordcabinet3

My favorite interior design blog Apartment Therapy is currently having a “My Bedroom Retreat” contest where folks can upload pictures of their bedrooms and compete for some prizes. Well, this was great motivation for me to get my curtains hung and take some decent pictures of my room.  I love how the room has turned out – I realize it’s extremely girly, but I’m fairly certain that this early-2o’s unmarried time is the only time I will ever be able to get away with such a feminine space. So I just went for it.  I was aiming for feminine without being childishly girly. How’d I do?

Source list @ the bottom.

IMG_4092 copyBedroom photos IMG_4098 copy IMG_4105 copy IMG_4112 copy Bedroom photos IMG_4045 copy IMG_4079 copy IMG_4083 copy IMG_4100 copy IMG_4110 copy

Source list:

Paint color: Behr Spring Stream

Curtains: Pottery Barn

Curtain rod: Country Curtains

Chandelier: Pottery Barn

Carriage lanterns: Wayfair

Bed: family heirloom

Quilt: Lands End

Pillows: Hand made by me (with much help from my mother)

Queen Anne chair: Junk store find that I painted.

Vanity, Dresser and Desk: Antique store

Vanity stool: Amazon

Desk chair: Antique store

Mirror: TJ Maxx Home Goods

Bench: Antique store

Glass lamps: TJ Maxx Home Goods

Glass bedside lamp: family heirloom

Bedside table: Antique, painted it myself